


Akhni Fulab – Pilau & Mutton Meat
Ingredients
- 1 kg Mutton Meat
- 2 Onions
- 5 cloves Garlic
- 1 Ginger
- 4 Bay Leaves
- 4 Cinnamon Sticks
- 4 Cardamoms
- 2 tsp Salt
- 3 tsp Mild Mixed Curry Powder
- 1.5 tsp Coriander Powder
- 1.5 tsp Zeera Powder
- 1 tsp Turmeric Powder
- 4 tbsp Oil
- 700 gm Basmati Rice
- 2 Onions
- 1 Ginger
- 2 tbsp Oil
- 4 tbsp Ghee
- 1 tsp Salt
- 4 Bay Leaves
- 4 Cinnamon Sticks
- 4 Cardamom
- 5 Cloves
- 20 Whole Black Peppers
- 10 Green Chilies
Instructions
- Measure 3.5 cups of basmati rice and wash under running cold water till the water runs clear. Soak in enough cold water to cover the rice and leave to one side.
- Place your drained meat in your pressure cooker (or standard pot if you are not using a pressure cooker).
- Peel and chop 2 large onions, crush 5 cloves of garlic and 1 large stem of ginger. Add these ingredients to the pressure cooker/standard pot....
- along with 4 bay leaves, 4 pieces of cinnamon sticks, 4 cardamoms and 2 tsp of salt.
- Mix thoroughly and cover your pressure cooker and secure the lid. Cook the meat for 20 - 25 mins in a pressure cooker. If you're using a standard pot cook the meat for between 1 to 1½ hours.
- While the meat cooks you can prepare the ingredients for the main part of the pilau if you're using a pressure cooker, if you're using a standard pot, wait till the meat is almost cooked before you start. Only start to cook the main rice/pilau part of this recipe when your meat is almost cooked.
- Peel an extra large stem of ginger for the pilau. I have shown you how large the piece I'm using is by holding it in my hand. Cut the ginger using a knife into fairly large pieces (top right photo). Please DO NOT use crushed/minced ginger for this stage as you really want to brown the ginger to release it's flavour and the finer the ginger is the quicker it will burn and you won't have a good tasting pilau, at least that's what I think. I sometimes use crushed ginger for cooking the lamb meat but not for this part. Peel and chop 2 large onions.
- In another large saucepan heat 2 large serving spoons of vegetable oil, the wooden spoon is my measure here....
- and add 4 tbsp of ghee. Once the ghee has fully melted and the oil is hot add the chopped ginger, keep the flame on medium - high to brown the ginger, this can take up to 10 minutes. It is important to stir the ginger while it browns to ensure even browning, you want a golden brown colour all over.
- Once all the ginger is golden brown as shown in photo (top left) add the 2 chopped onions. Mix and fry the onions uncovered over a medium - high flame, stir occasionally.
- At this point (approx 20 - 25 minutes later) I removed the lid from my pressure cooker and checked my meat, allow all the steam to escape before removing the lid. I found that the meat was cooked enough for me to now add my spices. You should see the fat bubbling around the edges of the pan to indicate the meat has cooked enough (top right photo). For the last stage of cooking the meat I shall not be using the pressure cooker lid but a standard lid to enable the spices to fry and for me to stir the meat with ease.
- Now to the meat add 3 tsp of curry powder, 1.5 heaped tsp coriander powder 1.5 heaped tsp jeera powder, 1 tsp turmeric powder and 4 tbsp of ghee.
- Mix the spices and ghee and allow the meat to cook for a further 15 - 20 minutes on the stove top. Cover with a normal lid to allow you to stir the meat now and then. The reason for finishing off the meat this way is that in a pressure cooker the liquid doesn't evaporate and the spices will not roast well, so this needs to be done in the standard manner.
- Once the onions for the pilau are golden brown (bottom left photo) add the whole spices; 4 bay leaves, 4 cinnamon sticks, 4 cardamoms, 5 cloves and 20 - 25 whole black peppers. Fry for a couple of minutes before adding the soaked rice.
- REMEMBER TO BOIL A FULL KETTLE OF WATER AT THIS POINT.
- Add the soaked basmati rice by hand draining excess water before adding. Add 1 tsp of salt also and fry over a medium flame for between 8 - 10 minutes, stirring to prevent the rice burning/sticking. Add 10 green chillies.
- If you are not using a non stick pan (like me) you will find the rice sticks to the bottom of your saucepan and it's important that you stir and scrape the rice away from the bottom and the edges of the pan but allow it to fry for the stated time (8 - 10 minutes). Doing this means your rice will absorb most of the water when you add it. You want the rice to look solid white in colour (top right photo) and with a hint of golden brown colour from the onions. Leave flame on LOW - MEDIUM while frying the rice.
- By now the oil should have separated from the meat and be bubbling around the edges of the pan (bottom left photo). Check your meat and test for tenderness, if you're happy you can now add it to the fried rice; if you want it to cook longer turn off your rice and cook the meat till you're happy and then heat up the rice and then add the meat.
- Fry the meat with the rice for several minutes over a MEDIUM heat stirring frequently, after a few minutes turn the heat up to HIGH.
- Add some boiling water to the pan you cooked the meat in to extract any fat/flavour remaining and then add this to your pilau. You should hear the water sizzle at the bottom as it hits the pan, if you don't hear this you haven't heated the pan up enough. By heating the bottom of the pan like this the water will start to boil instantly and will produce a fluffy pilau instead of a soggy one.
- Keeping the flame on HIGH, top up the pilau with enough boiling water from your kettle and stir with a wooden spoon to ensure water reaches the bottom of the pan also. Taste the water, it should taste salty, I found my pilau was lacking slightly so sprinkled a little more over the top. Add enough boiling water to just cover the rice and meat (bottom right photo), don't drown it in water!
- Cover the pan with a lid and keep boiling on HIGH for 5 minutes, then turn the heat down to MEDIUM (top right photo) and simmer for a further 5 - 7 minutes.
- Uncover and check to see if all the water has been absorbed, you may notice water floating along the top of the pilau (bottom left photo), help disperse the water to the bottom of the pan by lifting the rice from edges and combine the water with the pilau.
- Finally turn the flame down to LOW, cover the pilau with some foil and place the lid over the top. The foil traps the steam in and allows the moisture to drip back into the pilau as it cooks so should not require any extra water. Leave this to cook for a further 12 - 15 minutes or until the rice is soft when pressed between your fingers. You'll be able to tell when it's cooked as the pilau will release an amazing aroma.
- I always like dotting some extra ghee over the top once the pilau is cooked for a final ghee boost! Keep this covered, as the ghee melts into the pilau it makes it taste soooo amazing!!!
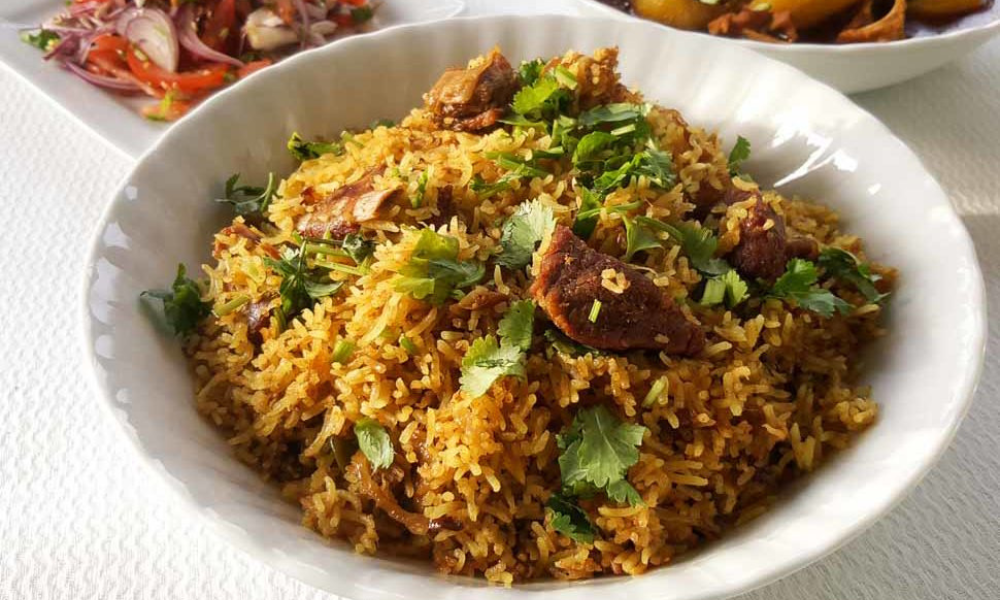
- Garnish your akhni fulab/pilau with coriander and serve hot as is or with some extra sides...
اخنی فلاب - پلاؤ اور مٹن کا گوشت
Ingredients
- مٹن گوشت 1 کلو
- پیاز 2
- لونگ لہسن 5
- ادرک 1
- تیز پتا 4
- دار چینی 4
- الائچی 4
- نمک 2 چائے کا چمچ
- ہلکا مکسڈ کری پاؤڈر 3 چائے کے چمچ
- دھنیا پاؤڈر ½1 چائے کا چمچ
- زیرہ پاؤڈر ½1 چائے کا چمچ
- ہلدی پاؤڈر 1 چائے کا چمچ
- تیل 4 کھانے کے چمچ
- باسمتی چاول 700 گرام
- پیاز 2
- ادرک 1
- تیل 2 کھانے کے چمچ
- گھی 4 کھانے کے چمچ
- نمک 1 چائے کا چمچ
- تیز پتا 4
- دار چینی 4
- الائچی 4
- لونگ 5
- پوری کالی مرچ 20
- ہری مرچ 10
Instructions
- 3.5 کپ باسمتی چاول کی پیمائش کریں اور بہتے ہوئے ٹھنڈے پانی کے نیچے اس وقت تک دھوئیں جب تک پانی صاف نہ ہوجائے۔ چاولوں کو ڈھانپنے کے لیے کافی ٹھنڈے پانی میں بھگو دیں اور ایک طرف چھوڑ دیں۔
- اپنے خشک گوشت کو اپنے پریشر ککر میں رکھیں (یا معیاری برتن اگر آپ پریشر ککر استعمال نہیں کررہے ہیں)۔
- 2 بڑے پیاز کو چھیل کر کاٹ لیں، لہسن کے 5 لونگ اور ادرک کا 1 بڑا تنا کچل لیں۔ ان اجزاء کو پریشر ککر/معیاری برتن میں شامل کریں۔
- اس کے ساتھ 4 تیز پتا، دار چینی کے 4 ٹکڑے، 4 الائچی اور 2 چمچ نمک۔
- اچھی طرح مکس کریں اور اپنے پریشر ککر کو ڈھانپیں اور ڑککن کو محفوظ کریں۔ پریشر ککر میں گوشت کو 20 سے 25 منٹ تک پکائیں۔ اگر آپ معیاری برتن استعمال کر رہے ہیں تو گوشت کو 1 سے 1½ گھنٹے تک پکائیں۔
- جب گوشت پکتا ہے تو آپ پیلاؤ کے اہم حصے کے لیے اجزاء تیار کر سکتے ہیں اگر آپ پریشر ککر استعمال کر رہے ہیں، اگر آپ معیاری برتن استعمال کر رہے ہیں، تو شروع کرنے سے پہلے گوشت کے تقریباً پکنے تک انتظار کریں۔ جب آپ کا گوشت تقریباً پک چکا ہو تب ہی اس ترکیب کے اہم چاول/پلاؤ حصے کو پکانا شروع کریں۔
- پلاؤ کے لیے ادرک کے ایک اضافی بڑے تنے کو چھیلیں۔ میں نے آپ کو دکھایا ہے کہ میں جو ٹکڑا استعمال کر رہا ہوں وہ اپنے ہاتھ میں پکڑ کر کتنا بڑا ہے۔ چاقو کا استعمال کرتے ہوئے ادرک کو کافی بڑے ٹکڑوں میں کاٹ لیں (اوپر دائیں تصویر)۔ براہ کرم اس مرحلے کے لیے پسی ہوئی ادرک کا استعمال نہ کریں کیونکہ آپ واقعی ادرک کو براؤن کرنا چاہتے ہیں تاکہ اس کا ذائقہ جاری ہو اور ادرک جتنی باریک ہوگی یہ اتنی ہی جلدی جلے گی اور آپ کو اچھا چکھنے والا پائلو نہیں ملے گا، کم از کم میں تو یہی کرتا ہوں۔ سوچو میں کبھی کبھی بھیڑ کے گوشت کو پکانے کے لیے پسی ہوئی ادرک کا استعمال کرتا ہوں لیکن اس حصے کے لیے نہیں۔ 2 بڑے پیاز کو چھیل کر کاٹ لیں۔
- ایک اور بڑے ساس پین میں سبزیوں کے تیل کے 2 بڑے سرونگ چمچ گرم کریں، یہاں لکڑی کا چمچ میرا پیمانہ ہے....
- اور 4 چمچ گھی ڈالیں۔ ایک بار جب گھی مکمل طور پر پگھل جائے اور تیل گرم ہو جائے تو اس میں کٹی ہوئی ادرک ڈالیں، آنچ کو درمیانے درجے پر رکھیں اور ادرک کو براؤن کرنے کے لیے اونچا کریں، اس میں 10 منٹ لگ سکتے ہیں۔ یہ ضروری ہے کہ ادرک کو ہلائیں جب کہ یہ بھوری ہو جائے تاکہ براؤن ہونے کو یقینی بنایا جا سکے، آپ کو ہر طرف سنہری بھورا رنگ چاہیے۔
- ایک بار جب تمام ادرک گولڈن براؤن ہو جائے جیسا کہ تصویر میں دکھایا گیا ہے (اوپر بائیں) 2 کٹے ہوئے پیاز شامل کریں۔ درمیانی آنچ پر کھلے ہوئے پیاز کو مکس کریں اور بھونیں، کبھی کبھار ہلائیں۔
- اس مقام پر (تقریباً 20 - 25 منٹ بعد) میں نے اپنے پریشر ککر سے ڈھکن ہٹایا اور اپنے گوشت کو چیک کیا، ڈھکن ہٹانے سے پہلے تمام بھاپ کو نکلنے دیں۔ میں نے محسوس کیا کہ گوشت میرے لیے اتنا پکا ہوا تھا کہ اب میں اپنا مصالحہ ڈال سکتا ہوں۔ آپ کو پین کے کناروں کے گرد چربی کا بلبلا نظر آنا چاہیے تاکہ یہ ظاہر ہو سکے کہ گوشت کافی پکا ہوا ہے (اوپر دائیں تصویر)۔ گوشت کو پکانے کے آخری مرحلے کے لیے میں پریشر ککر کا ڈھکن استعمال نہیں کروں گا بلکہ ایک معیاری ڈھکن استعمال کروں گا تاکہ مصالحے کو فرائی کر سکیں اور میرے لیے گوشت کو آسانی سے ہلایا جا سکے۔
- اب گوشت میں 3 عدد کری پاؤڈر، 1.5 عدد دھنیا پاؤڈر 1.5 عدد زیرہ پاؤڈر، 1 عدد ہلدی پاؤڈر اور 4 کھانے کا چمچ گھی ڈالیں۔
- پلاؤ کے لیے پیاز گولڈن براؤن ہونے کے بعد پورا مصالحہ ڈالیں۔ 4 خلیج کے پتے، 4 دار چینی کی چھڑیاں، 4 الائچی، 5 لونگ اور 20-25 پوری کالی مرچ۔ بھیگے ہوئے چاول ڈالنے سے پہلے چند منٹ بھونیں۔
- اس مقام پر پانی کی ایک پوری کیتلی کو ابالنا یاد رکھیں۔
- بھگوئے ہوئے باسمتی چاول کو شامل کرنے سے پہلے ہاتھ سے اضافی پانی نکال دیں۔ 1 چائے کا چمچ نمک بھی ڈالیں اور درمیانی آنچ پر 8 سے 10 منٹ تک بھونیں، چاول کے جلنے / چپکنے سے بچنے کے لیے ہلاتے رہیں۔ 10 ہری مرچیں ڈال دیں۔
- اگر آپ نان اسٹک پین (میری طرح) استعمال نہیں کر رہے ہیں تو آپ کو چاول کی چھڑیاں آپ کے سوس پین کے نیچے نظر آئیں گی اور یہ ضروری ہے کہ آپ چاولوں کو پین کے نیچے اور کناروں سے ہلائیں اور کھرچیں لیکن اسے بھوننے دیں۔ بیان کردہ وقت کے لیے (8 - 10 منٹ)۔ ایسا کرنے کا مطلب ہے کہ جب آپ اسے شامل کریں گے تو آپ کے چاول زیادہ تر پانی جذب کر لیں گے۔ آپ چاہتے ہیں کہ چاول ٹھوس سفید رنگ میں نظر آئے (اوپر دائیں تصویر) اور پیاز سے سنہری بھوری رنگ کے اشارے کے ساتھ۔ چاولوں کو فرائی کرتے وقت آنچ ہلکی - درمیانی آنچ پر چھوڑ دیں۔
- اب تک تیل گوشت سے الگ ہو چکا ہو گا اور پین کے کناروں کے گرد بلبلا ہو جائے گا (نیچے بائیں تصویر)۔ اپنا گوشت چیک کریں اور نرمی کی جانچ کریں، اگر آپ خوش ہیں تو اب آپ اسے فرائیڈ رائس میں شامل کر سکتے ہیں۔ اگر آپ چاہتے ہیں کہ یہ زیادہ پک جائے تو چاول بند کر دیں اور گوشت کو اس وقت تک پکائیں جب تک آپ خوش نہ ہو جائیں اور پھر چاولوں کو گرم کریں اور پھر گوشت ڈال دیں۔
- چاولوں کے ساتھ گوشت کو کئی منٹ تک درمیانی آنچ پر کثرت سے ہلاتے رہیں، چند منٹوں کے بعد گرمی کو ہائی پر کر دیں۔
- جس پین میں آپ نے گوشت پکایا ہے اس میں تھوڑا سا ابلتا ہوا پانی ڈالیں تاکہ کوئی بھی چربی/ذائقہ باقی رہ جائے اور پھر اسے اپنے پیلاؤ میں شامل کریں۔ آپ کو پین سے ٹکرانے کے ساتھ ہی نیچے سے پانی کی آواز سننی چاہئے، اگر آپ یہ نہیں سنتے ہیں تو آپ نے پین کو کافی گرم نہیں کیا ہے۔ پین کے نچلے حصے کو اس طرح گرم کرنے سے پانی فوراً ابلنا شروع ہو جائے گا اور اس سے بھیگنے کی بجائے فلا پائلو نکلے گا۔
- شعلے کو بلند رکھتے ہوئے، اپنی کیتلی سے کافی ابلتے ہوئے پانی کے ساتھ پائلو کو اوپر کریں اور لکڑی کے چمچ سے ہلائیں تاکہ پانی پین کے نیچے تک پہنچ جائے۔ پانی کا مزہ چکھیں، اس کا ذائقہ نمکین ہونا چاہیے، میں نے محسوس کیا کہ میرے پلاؤ میں قدرے کمی تھی اس لیے اوپر سے تھوڑا سا مزید چھڑکا۔ چاول اور گوشت کو ڈھانپنے کے لیے کافی ابلتا ہوا پانی ڈالیں (نیچے دائیں تصویر)، اسے پانی میں نہ ڈوبیں!
- پین کو ڈھکن سے ڈھانپیں اور 5 منٹ تک ہائی پر ابلتے رہیں، پھر آنچ کو MEDIUM (اوپر دائیں تصویر) پر کر دیں اور مزید 5 سے 7 منٹ تک ابالیں۔
- کھولیں اور یہ دیکھنے کے لیے چیک کریں کہ آیا سارا پانی جذب ہو گیا ہے، آپ پیلاؤ کے اوپری حصے میں پانی تیرتا دیکھ سکتے ہیں (نیچے بائیں تصویر)، کناروں سے چاول اٹھا کر پانی کو پین کے نیچے تک پھیلانے میں مدد کریں اور پانی کو یکجا کریں۔ پیلاؤ کے ساتھ.
- آخر میں شعلے کو کم کر دیں، پلاؤ کو کچھ ورق سے ڈھانپیں اور ڈھکن کو اوپر رکھیں۔ ورق بھاپ کو پھنسا دیتا ہے اور نمی کو پلاؤ میں واپس ٹپکنے دیتا ہے کیونکہ یہ پکتا ہے اس لیے اضافی پانی کی ضرورت نہیں ہونی چاہیے۔ اسے مزید 12 سے 15 منٹ تک پکانے کے لیے چھوڑ دیں یا جب تک چاول نرم نہ ہو جائیں جب آپ کی انگلیوں کے درمیان دبایا جائے۔ آپ یہ بتا سکیں گے کہ یہ کب پکایا جائے گا کیونکہ پائلو ایک حیرت انگیز مہک جاری کرے گا۔
- ایک بار جب پلاؤ پک جاتا ہے تو مجھے گھی کے آخری اضافے کے لیے اوپر سے کچھ اضافی گھی لگانا ہمیشہ پسند ہے! اس کو ڈھانپ کر رکھیں، جیسے ہی گھی پلاؤ میں پگھلتا ہے اس کا ذائقہ لاجواب ہو جاتا ہے!!!
- اپنے اکھنی فلاب/پلاؤ کو دھنیا سے گارنش کریں اور گرم گرم سرو کریں جیسا کہ ہے یا کچھ اضافی سائیڈز کے ساتھ.